paolo
-
Posts
118 -
Joined
-
Last visited
-
Days Won
1
Content Type
Profiles
Gallery
Everything posted by paolo
-
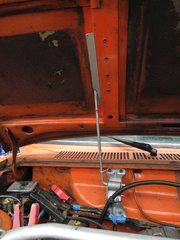 Photo of low profile hood support installed. Prop rod works similar to stock prop rod except you pull leftward to release rather than forward. Note raised aluminum front strut tower brace near photo bottom. See Front Strut-Tower Cross-brace
 -
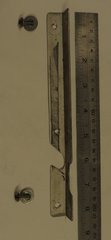 Photo of prototype with 4 years of use. Prop rod works similar to stock prop rod except you pull leftward to release rather than forward.
 -
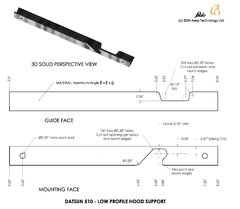 Aluminum angle used is cut from a Home Depot metals part (3/4" x 3/4" x 1/16" - 3-ft length). Can be constructed accurately enough using a hack saw, drill with bits, and a metal file. Suggest mounting with stainless screw & washers. The #8 pan-head sheet metal screws work well.
 -
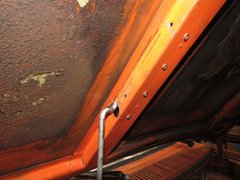 Prop rod may require slight bend outward (passenger side) to adjust tension against slide. Round end of rod (grind or file) where it touches guide to ensure smooth operation. Cut stock guide off using spot weld cutter. Remaining hubs seen protruding from brace in image. Smooth nubs and fill as preferred.
 -
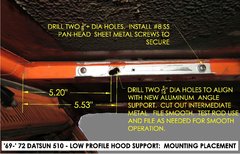 Install aluminum angle prop rod guide per dimensions in image. Placement shown sets hood raised angle at about 46.5 degrees from horizontal, slightly more than stock. Adjust placement laterally to accommodate preferred hood angle.
 -
From the album: Wagon Mods
Installation Data. Placement shown sets hood raised angle at about 46.5 degrees from horizontal, slightly more than stock. Adjust placement laterally to accommodate preferred hood angle. Install aluminum angle prop rod guide per dimensions in image.© Paolo Musante 2024
-
Various modifications or upgrades to the Datsun 510 Wagon (1968-1972 vintage). Some of these mods also apply to the Sedans.
-
-
-
From the album: Wagon Mods
Low profile Support Installed. Prop rod works identical to stock prop rod except need to pull leftward to release rather than forward. Note raised aluminum front strut tower brace near photo bottom. See Front Strut-Tower Cross-brace© Paolo Musante 2024
-
From the album: Wagon Mods
Construction Details. Aluminum angle (cut from Home Depot metals part: 3/4" x 3/4" x 1/16" - 3-ft length). Can be constructed accurately enough using a hack saw, drill with bits, and a metal file.© Paolo Musante 2024
-
-
Useful DATA you can see for FREE!
-
-
From the album: Useful Data
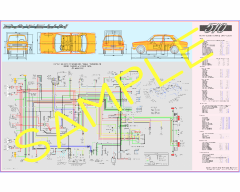
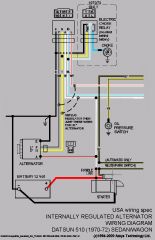
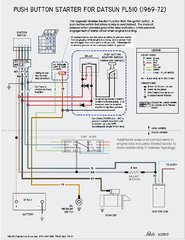
Wiring diagram for a push-button starter system. All needed data and specific notes provided on image. Installation is partially shown in certain images in my Wiring Bits and Odd Ends album.© Paolo Musante 2012
-
From the album: Wagon Mods
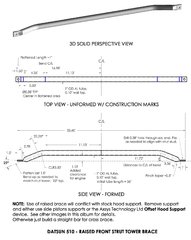
Simple cost effective, very lightweight tower brace made from 1" dia Aluminum tube. Tools needed: Tubing bender (recommended but not required), heavy bench vice, and drill with 3/8" bit. Grinder to smooth edges.© Paolo Musante 2010
-
From the album: Wagon Mods
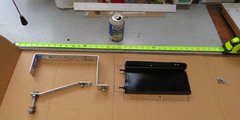
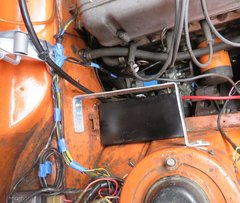
Construction Data for alternate battery tray in engine bay, similar to 240Z placement. This tray is designed for a TYPE 51R battery. Tray shown (black) was conveniently made from old computer case. Tray thickness estimated at 14-ga. In service for > 3 years. Aluminum bracketry made from stock purchased from Home Depot (Home/Hardware/Metal Stock/Flat Bars). Bolts all metric sizes (6-mm to tray and 10-mm through frame), length as needed.© Paolo Musante 2024
-
From the album: Wagon Mods
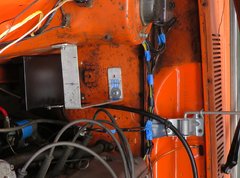
Top view of alternate battery tray in engine bay, similar to 240Z placement© Paolo Musante 2024
-
From the album: Wagon Mods
Front View for alternate battery tray in engine bay, similar to 240Z placement© Paolo Musante 2024
-

From the album: Wagon Mods
Front View alternate battery tray in engine bay, similar to 240Z placement, showing TYPE 51R battery installed.© Paolo Musante 2024
-

datsun 510 Datsun 510 Wagon: Lightweight Spare Tire Access Rod
paolo posted a gallery image in Members Albums
From the album: Wagon Mods
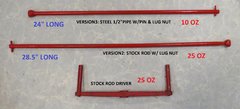
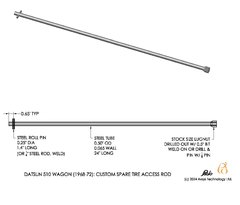
Lightweight alternative to the stock spare tire access/lowering rod & handle. Two approaches with item weights shown. 1. The 24" long rod is custom made from steel tubing. Construction shown an following image. 2. The 28.5" ling rod is the stock rod with a lug nut hammered onto the end. Best & strongest fit is to use square file to expand hole slightly. Welding optional but stronger. Both option eliminate need for the stock rod driver.© Paolo Musante 2025
-
datsun 510 Datsun 510 Wagon: Spare Tire Access Rod Construction Data
paolo posted a gallery image in Members Albums
From the album: Wagon Mods
Construction details for alternative lightweight Datsun 510 wagon spare tire access/lowering tool.© Paolo Musante 2024
-

From the album: nuovo cinquecentodieci
Custom WA state license plate for my nearly perfect, basically stock 1972 4dr Dime. First acquired on 2013.© Paolo Musante 2013
-

From the album: nuovo cinquecentodieci
IDX = I + DX (roman number for 510) -
The New 510 overlay the Original 510
-
-
From the album: Useful Data
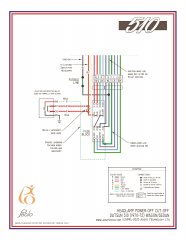
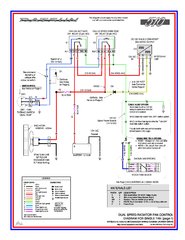
Wiring Diagram for Datsun 510 (68-72) cooling system using electric fan upgrade for two speed fan control - PAGE-1. See PAGE-2 for component notes and design parameters. Component design descriptions for proven as-built system with usage details. Design for stock L16, L18, or L20B engines, Likely a great upgrade for other engine swaps such as SR20, KA24, etc. The devil is in the design details. The circuit set up for a single fan but can be easily adapted for dual fan system. The dual speed system works best using a low temperature dual range switch as described in notes on PAGE-2. Refer to PAGE-2 for important notes about cooling system build.© Axsys Technology Ltd.
-
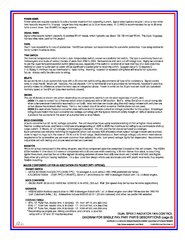
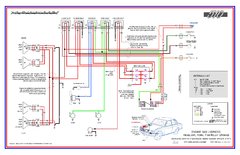
From the album: Useful Data
Wiring Diagram for Datsun 510 (68-72) cooling system using electric fan upgrade for two speed fan control - PAGE-2. The goals of the lower voltage, two speed fan control design is to reduce both the electrical power demand for average street use and also reduce fan noise. By starting fan at lower temperature with lower speed, it smooths out system temperature peaks and reduces overall load. If run live after turn-off, this also saves battery capacity for restart. Component design descriptions for proven as-built system with usage details. Design for stock L16, L18, or L20B engines, Likely a great upgrade for other engine swaps such as SR20, KA24, etc. The devil is in the design details. The circuit set up for a single fan but can be easily adapted for dual fan system. Fans suggested are oriented toward low power consumption, low profile, and lower noise and well suited for as-designed design radiator. Higher CFM versions are applicable with double the amperage requirement, taller profiles (less engine room) and nearly double the flow rates. As noted, fan choice dependent on engine build, driving style, local climate, and alternator capacity (harness suitability). Engine cooling system design requires consideration of coolant operating temperature (thermostat), radiator efficiency with available heat disposal capacity per given installation, fan switch temperature ratings coincident with placement within radiator, engine size, fan flow capacity, etc.© Axsys Technology Ltd.